
Today, I am again here with a dacing Photoshop Tutorial.
In this tutorial, we will be creating a 3D Transparent Glass Text Effect. The Glass Effect is achieved with layer styles so it can be easily applied to any font or Photoshop shape.
OK...without talking more I am going to start this tutorial.
Step #1
First You will need to download the two textures below and convert them into photoshop patterns for later. To do this simply open each image then go to EDIT>>DEFINE PATTERN in the menu.


Step #2
Create a new transparent document 880px*540px at 72 dpi as seen below.

Step #3
To keep our psd file organized first click on the folder icon in the layer pallet 3 times to create three folders and name them FRAME, TEXT, and BACKGROUND respectively.

Step #4
Create a new layer within the FRAME folder and name it frame. Activate the shape tool by typing U, make sure the rectangle shape tool is selected, then draw out a square similar to the one below, leaving a little room on the top and bottom.

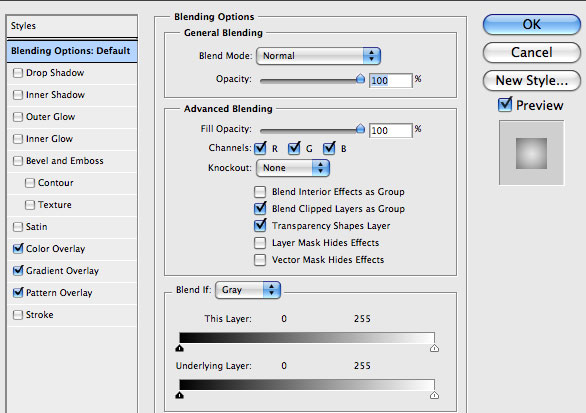
Step #5
Activate the by going to LAYER >> LAYER STYLE >> BLENDING OPTIONS in the menu and enter the settings as given below.


Step #6
Create a new layer above the frame layer, activate the text tool by typing T, then enter the settings below and type out a title. (www.netpuppet.tk)

Step #7
Within the BACKGROUND folder create a new pattern fill layer by going to LAYER >> NEW FILL LAYER >> PATTERN in the menu in the menu and choose the smoky pattern you installed in step #1 as seen below.

Step #8
Open the layer styles dialog box on the pattern layer by going to LAYER >> LAYER STYLE >> BLENDING OPTIONS in the menu and enter the setting below.


Step # 9
Within the TEXT folder now, create a new text layer, activate the text tool by typing T and type in some text with the settings below. If you would like to use the font we are using here you can get it for free on Dafont.com

Step #10
Duplicate the text layer you just created by going to LAYER >> DUPLICATE LAYER then open up the layer styles pallet on the top text layer by going to LAYER >> LAYER STYLE >> BLENDING OPTIONS in the menu and enter the settings below.


Step #11
Open up the layer styles pallet on the bottom text layer and enter the settings you see below.


That's IT!
You should now have something similar to what you see below.

Hey..... Post don't forget to post comments and like our community pages....
Thank You...


0 comments:
Post a Comment