Wednesday, 10 April 2013

17 Awesome, Must Try Notepad Tricks


Hi friends, Once again I am here with a new Awesome Trick for you.
In today's post I am going to share some amazing and awesome notepad trick. Which you can try yourself and make your friends shoked.

Trick #01: Bush Hid the Facts/This App Can Break

This is one of the most popular notepad tricks because of its mysterious nature. In order to get an idea as to what this trick does, just follow the steps given below:

>> Open Notepad.
>> Type "BUSH HID THE FACTS" or "this app can break" (without quotes).
>> Save that file with any name and close it.
>> Open it Again to see the magic.

Reason For This Behavior: It is known as the 4335 Rule. It means that if we enter four words separated by spaces, wherein the first word has 4 letters, the next two have three letters each, and the last word has five letters. Then Notepad Automatically hides the text into unknown code.

Trick #02: World Trade Center Attack Trick

As you might knowing that the flight number of the  plane that had hit World Trade Center on that dreadful day (9/11) was Q33NY. Now call this trick a coincidence or something else but whatever it is, it does startle us.

Open Notepad.
Type "Q##N" (without quotes) in capital letters.
Increase the font size to 72.
Change the font to Wingdings.

You will be amazed by the findings.

Trick #03: Make A Personal Log-Book or A Diary

Did you know that you can also use Notepad as a simple digital diary or a personal Log-Book ? Well, if you didn't then follow the below mentioned steps to make one for yourself !

    Open Notepad
    Type .LOG (in capital letters) and hit enter.
    Save it with any name and close it.
    Open it again.

When you open the file again you will see the current date and time being inserted automatically after the .LOG line. This will happen automatically every time you reopen the notepad file.

Trick #04: Test Your Anti-Virus

You can also test your anti virus program for its effectiveness using a simple notepad trick.
Follow the steps below to know more:

   Open Notepad
   Copy the code given below in the notepad file:
    X5O!P%@AP[4PZX54(P^)7CC)7}$EICAR-STANDARD-ANTIVIRUS-TEST-FILE!$H+H*
    Save it with an .exe extension like 'testvirus.exe'

As soon as you save this file, your antivirus program will detect the file (virus) immediately and will attempt to delete it. If this happens then your Antivirus is working properly. If not, then its time to look for some other reliable program.

Trick #05: Continually pop the CD Drive

    Open Notepad.
    Copy the code given below onto the notepad file:


Set oWMP = CreateObject(“WMPlayer.OCX.7?)
Set colCDROMs = oWMP.cdromCollection
do
if colCDROMs.Count >= 1 then
For i = 0 to colCDROMs.Count – 1
colCDROMs.Item(i).Eject
Next
For i = 0 to colCDROMs.Count – 1
colCDROMs.Item(i).Eject
Next
End If
wscript.sleep 5000
loop

Save it as "Anything.VBS".
Now open the file and see the magic! The file will continuosly force the CD rom to pop out!
And if you have more than one then it pops out all of them...

Trick #06: Matrix Effect

Not much to explain, just follow the steps and see the amazing matriz effect happens in your DOS window:

    Open Notepad
    Copy the below mentioned text in your notepad file:

       @echo offcolor 02
:start
echo %random% %random% %random% %random% %random% %random% %random% %random% %random% %random%
goto start
Save the file with .bat extension like 'matrix.bat'

Thats it. Just open the file to see the matrix effect right before your eyes!!!

Text #07: Change The Header/Footer Of Your Notepad File

More oftern than not whenever you get a printout of your notepad file, it starts with "Untitled" or the filename at top, and "Page" on bottom. Now if you want to get rid of it or want to change it, just follow the simples steps  given below.

   Open Notepad
   Click on File -> Page Setup

Replace the text written in the "Header" and "Footer" box (as shown above) by any of the following codes

&l     Left-align the characters that follw&c    Center the characters that follow&r     Right-align the characters that follow&d    Print the current date&t     Print the current time&f     Print the name of the document&p    Print the page number

Trick #08: Constantly Repeat Messages

Using this notepad trick you can annoy anyone and can actually force them to log off or leave the computer (LOL...) This notepad trick will create an infinite cycles of a message in the computer. Follow the steps to know more:

     Open Notepad.
     Paste the following code in the notepad file:


        @ECHO off
         :Begin
         msg *Hi
         msg *Are you having fun?
         msg *I am!
         msg *Lets have fun together!
         msg *Because you have been o-w-n-e-d
         msg * Trick by NetPuppet
         GOTO BEGIN

Save the file with any file name but with .bat as extension and close it.
ex: freakymessage.bat

After saving the file just open it (by double clicking) and see what happens.
Psstttt.... You can piss of your friends by sending it as an email attachment asking them to try it out!

Trick #09: Shut-down The Computer After Conveying Any Message

 This one is kind of an annoying trick and if used unknowingly can certainly cause problems (am serious). What this trick does is, after conveying a (any) message it shuts down the computer without any confirmation. In order to create the shutdown file, follow the below mentioned steps:

     Open Notepad.
     Paste the following code in it:

@echo off
msg *Its time to get some rest.
shutdown -c "Error! You have to take rest! Byeeeeeeee" -s

Save the file with any name but with .bat extension and close it. For eg: takerest.bat

Note: use this carefully. If you are playing prank then keep in mind that this may lead to loss as it shuts down the computer forcefully

Trick #10: Toggle Keyboard Button Simultaneously

Using Notepad (and VB) you can set different keys on your keyboard to toggle continuously.
Following are the 3 tricks using which different keys can be set to toggle simultaneously.
Follow the steps given under each head to try out the tricks.

             1. Caps Lock Key
Open Notepad.
Paste the following code in the notepad file:

Set wshShell=wscricpt.CreateObject("WScript.Shell")
do
wscript.sleep 100
wshshell.sendkeys "{CAPSLOCK}"
loop

Save the file with anyname.vbs and close it.
Now open the newly created file and see how the caps lock key behaves on your keyboard!

         2. Hit Enter Key Continuously
Open Notepad
Paste the following code in the notepad file:

Set wshShell=wscricpt.CreateObject("WScript.Shell")
do
wscript.sleep 100
wshshell.sendkeys "~(enter)"
loop
Save the file with any name .vbs and close it.
Now open the newly created file and see how the enter key behaves!

         3. Hit Backspace Key Continuously
Open Notepad
Paste the following code in the notepad file:

MsgBox "Lets Rumble"
Set wshShell=wscricpt.CreateObject("WScript.Shell")
do
wscript.sleep 100
wshshell.sendkeys "{bs}"
loop
Save the file with any name and with .vbs extension and close it.
Now open the newly created file and see how the key behaves!

In order to end the vbs script (stop continuous key pressess), open task manager and end the wscript.exe process as shown in image below.

Tuesday, 9 April 2013

3D Transparent Glass Text Effect


Hay Friends, How are you all. I know You all will be fine and dinchak.
Today, I am again here with a dacing Photoshop Tutorial.
In this tutorial, we will be creating a 3D Transparent Glass Text Effect. The Glass Effect is achieved with layer styles so it can be easily applied to any font or Photoshop shape.

OK...without talking more I am going to start this tutorial.

Step #1

First You will need to download the two textures below and convert them into photoshop patterns for later. To do this simply open each image then go to EDIT>>DEFINE PATTERN in the menu.


Step #2

Create a new transparent document 880px*540px at 72 dpi as seen below.


Step #3

To keep our psd file organized first click on the folder icon in the layer pallet 3 times to create three folders and name them FRAME, TEXT, and BACKGROUND respectively.


Step #4

Create a new layer within the FRAME folder and name it frame. Activate the shape tool by typing U, make sure the rectangle shape tool is selected, then draw out a square similar to the one below, leaving a little room on the top and bottom.


Step #5

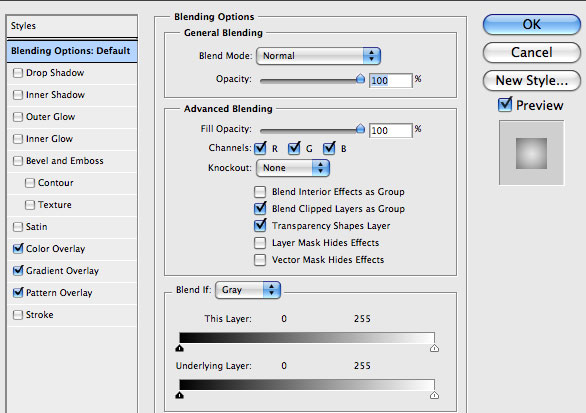
Activate the by going to LAYER >> LAYER STYLE >> BLENDING OPTIONS in the menu and enter the settings as given below.


Step #6

Create a new layer above the frame layer, activate the text tool by typing T, then enter the settings below and type out a title. (www.netpuppet.tk)


Step #7

Within the BACKGROUND folder create a new pattern fill layer by going to LAYER >> NEW FILL LAYER >> PATTERN in the menu in the menu and choose the smoky pattern you installed in step #1 as seen below.


Step #8

Open the layer styles dialog box on the pattern layer by going to LAYER >> LAYER STYLE >> BLENDING OPTIONS in the menu and enter the setting below.


Step # 9

Within the TEXT folder now, create a new text layer, activate the text tool by typing T and type in some text with the settings below. If you would like to use the font we are using here you can get it for free on Dafont.com


Step #10

Duplicate the text layer you just created by going to LAYER >> DUPLICATE LAYER then open up the layer styles pallet on the top text layer by going to LAYER >> LAYER STYLE >> BLENDING OPTIONS in the menu and enter the settings below.


Step #11

Open up the layer styles pallet on the bottom text layer and enter the settings you see below.


That's IT!

You should now have something similar to what you see below.


Hey..... Post don't forget to post comments and like our community pages....
Thank You...


Monday, 8 April 2013

UNLOCK HUAWEI E1732 IDEA NET SETTER MODEM (FREE PERMANENT SOLUTION)

Few months back idea has launched 3g huawei usb modem which is having max speed of 7.2mbps but main problem was it can be unlocked using firmware upgrade or downgrade because its having customized firmware so our team was working on it from few months. last week we have also written the article which is on unlock e1732 using dc unlocker but main drawback was its not free it require some credits but finally i am here with a permanent solution for E1732 which is totally free so go ahead and unlock your E1732 which is locked from last 5 months :)


Requirements :-
  1. CDMA Workshop (Download It From This Link)
  2. E1732 Downgrader (Download It From This Link)
  3. Mobile Partner 23
Steps you have to Follow :-
  • First of all download all requirements (you may need to disable your antivirus)
  • Plug your E1732 with any other operator sim and let it install its driver
  • Now just Right click on your MY COMPUTER ICON >> PROPERTIES >> DEVICE MANAGER >>Ports (COM & LPT) then you can see there something like HUAWEI Mobile Connect – 3G Application Interface (COM8) then com8 is your systems port numberplease note the port number 
1. Now Run CDMA WOrkshop.Exe and  Click on Main and select the com port number in COM Settings (AT mode)box.

2.   Now click on Connect.

3. Now click on Read. and let it read your modem information and you can see your modem information on the left panel. (If not so, your port number might be wrong, just look for it once again as described before and select correct port).


4.   Now Click on Security Tab.
5.   Under Security Tab, select SPC.
6.   Now choose Send '000000' from the drop down menu.

7.  Now just navigate to Memory Tab >> NV Items.
8.  Under NV Items click on Read. you can see a pop up box, now click on OK.
    Now you can see NV Backup Box now in Last NV Item box type 9999 and click on OK and save it with any name. and it will backup your data let it be complete to 100% and now minimize CDMA  Workshop.


9.  Now run E1732 Downgrader >> Accept Terms and Conditions >> Then Click on Next and it will read your modem. Let it be finish then it will show your modem data then click on Start. In the process you will get message like 'update failure after downloading program', then don't worry and click on OK.

Then again come on CDMA Workshop and come on Main Tab.


10.  Now click on Disconnect and unplug your modem.
Now again plug your modem and run CDMA Workshop and check and select com port as per we have done previously.


Then come on CDMA Workshop and select com port and click on connect.
11.  Now navigate to Memory Tab >> NV ITEMS.
12.  Click on Write. Now you can see one confirm box click OK, then click on Open and browse and select the file which we have saved before.
When the process completed to 100% you can see success message, then click on OK and Disconnect your modem.

Now you have unlocked Modem. Just plugin any SIM and use internet with high speed...

Please don't forget to post comments...
You can also like our facebook page or follow our tweets...

Thank You

Free Download AVS-Video-Editor 6.3 And License Key


Hi friends,How are you I hope you will be fine.Your Friend "Anuj Sharma" is back with a new site www.netpuppet.tk. On my old blog I posted about AVS Video Editor 6.3 and now I am here with the latest version of it 6.3. My friends in many functions you capture video for your sweet memories and many times you want edit the video and you spend money and time both for this. So my friends today I have a software of video editing.

“AVS Video Editor 6.3” is the very good software for editing and very easy to use. If you want to download and install on your P.C you can download only trial version. If you want to use activate edition then you have to pay for this, But I have a solution for this. I have not only “Keygen” of video editor, I have All AVS productfrom this application you can use any AVS product. AVS Video Editor 6.3 price is $199 USD or 10000/- INR.

Tuesday, 2 April 2013

Create Surreal Human Face with Flame Hair and Disintegration Effect in Photoshop


In this tutorial, I will show you the steps I took to create Surreal Human Face with Flame Hair and Disintegration Effect in Photoshop. Along the way, there will be some basic retouch skills applied, as well as applying textures and creating your own Photoshop brush from stock image. Have a try....

This is an intermediate tutorial so some steps can be tricky - it you are having difficulty with it, just post your comments and I'll be there to solve your problem.

This tutorial can create great effects for use on printed flyers, brochures and other marketing literatures.

Here is a preview of the final effect I have for this tutorial: (Click to Enlarge)...


So lets get Started.....

STEP 1

Create a new document sized 770 px * 1100 px with black background, load the model image into Photoshop  cut out the face portion with Lasso Tool:


Paste the selection onto our canvas, position it to the centre and erase the edge with a soft eraser:


Now we can tidy up the image a bit - although it's not really necessary to do those for the final effect, but it gives you a chance to have a go with a number of retouching tools in photoshop :)

Firstly try removing the dark spots with the "Spot Healing Brush Tool":


Then use Smudge Tool to with around 2%-5% strength to smooth out the skin:


Sharpen the eyes with the Sharpen Tool - set strength to around 30%:


and you will have the following effect:


STEP 2

Add the following adjustment layers to this face layer:

Black and White


Levels


Mask on the levels adjustment layer:


and you will have the following effects: (as you can see, I left the right side of the face lighter than the left)


Add some cloud behind the face for some mysterious effect :


Duplicate this cloud layer once and compress it down - this will form the ground texture :


Use a soft black brush to paint some shadow on the ground:


and you will have the following effect:


STEP 3

We can now add the plaster texture onto the image. Firstly load the selection of the face layer, drag the selection onto the plaster texture:


Copy and paste the selection onto the face, change the blending mode to "overlay", erase the left eye and hair portion of the texture with a soft eraser:


Add the following two adjustment layers to this texture as clipping mask:

Black and White


Levels


and you will have the following effect :


STEP 4

Now we can work on the flame portion of the image. Load the flame stock into Photoshop and use a 20-30 px feathered Lasso Tool to selection the following portion:


Copy and paste the selection onto our image, resize it to fit the size of the head, and erase the edge with a soft brush:


Add the following Levels adjustment layer as a clipping mask to this flame layer:

Layer:


Mask on this levels adjustment layer:


We can add some more flame texture to the image. Go back to the flame image and select the following portion:


Copy and paste the selection onto our document , move it below the first flame texture, then add the following Levels adjustment layer as a clipping mask:


Erase the edge with a soft eraser, and you will have the following effect:


You can render some more cloud on the flame for more effect:


STEP 5

Now let's create some flame hair strips. Go to the flame texture and select a portion as shown below:


Copy and paste the selection onto our document, bring up the liquify filter and use the following settings:


Use the forward warp tool to warp the flame to form the following shape:


Attach it to the forehead as shown below:


Duplicate this layer a number of times, resize and rotate each duplication and form a group of hair strips:


STEP 6

Now we can make a break-apart brush. Go to the plaster texture and use the quick selection tool to select a small piece:


Go to "Edit > Define Brush Preset" and define a new brush:


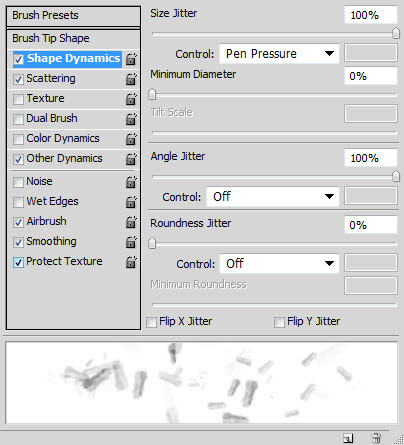
Once you define the brush, apply the following brush dynamics to it:

Shape Dynamics


Scattering


Other Dynamics


Tick the "Airbrush","Smoothing" and "Protect Texture" option.
Use this brush as eraser, go back to plaster texture layer and erase the edge with this brush:


Then use the brush to paint around the edge of the face - adjust the size, flow and opacity as you see fit:


STEP 7

We're almost done. For some final retouches, we can flatten the image and duplicate the background layer, then apply the following Reduce Noise Filter to the duplicate layer:


We don't want the whole image to be sharpened, so use a layer mask to hide the outer portion , the flame and the bottom portion. The following screenshot will give you an indication:


As a result, you can see the outer edge of the edge become blurred - this creates more depth for this image and add motion:


If you're happy with your work, you can just leave at that. Alternatively, you can add some more colour to the image to make a bit more vibrant.
There are several methods you can do this:
Colour balance adjustment layer with mask
Paint with a soft brush on a new layer (set blending mode to "overlay","soft light" or "color")
Play with channels
You can experiment with the aboves and see what result that brings you.

I have the following final effect: (click to enlarge)


That's it for this post ! Hope you enjoy this tutorial and find it useful! Till next time, have a great day!.....Don't forget to post your comments below...Thank You....
Powered by Blogger.